Alto Mare - Halo Infinite: Forge
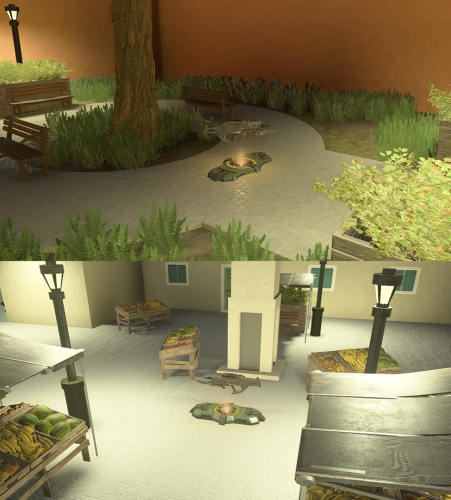
Alto Mare is a custom level I created in Halo Infinite's Forge level editor. The level is a 4v4 team-oriented map.. I designed the level with verticality in mind, designing for fun, interesting, and intuitive ways to traverse around the level through jumping, clambering, and through the use of a grapple.
Downloadable here on Halo Waypoint
Note: Level Design Document included at very end
Details
Time: Oct 2023
Team Size: 1
Tools: Halo Infinite: Forge
Role: Level Designer
Alto Mare is a custom level I created in Halo Infinite's Forge level editor. The level is a 4v4 team-oriented map.. I designed the level with verticality in mind, designing for fun, interesting, and intuitive ways to traverse around the level through jumping, clambering, and through the use of a grapple.
Note: Level Design Document included at very end
Details
Time: Oct 2023
Team Size: 1
Tools: Halo Infinite: Forge
Role: Level Designer
Purpose & Goal
After creating my previous level in Halo, Water Damage, I started on a game project in Unreal. After working on that project for the month of September, I wanted to work level design once more, and decided to put that project on hold for the time being. I decided on designing another map for Halo, as I really enjoyed it previously.
My personal goal for this project was to create a portfolio piece, while improving my overall level design experience, espeicially with gameplay flow, and navigation throughout the level.
Design Process
I began by reviewing my process from Water Damage, and seeing what worked and what didn't. I decided to go with a similar work flow, as found it really worked for me previously.
My goal was to get playtesting in ASAP, but of course that would depend on the availability of my playtesters.
In general, my process looked similar to the following list:
- Pre-planning / brainstorming
- Diagram layouts
- In-engine metric greybox
- Gameplay elements placements
- Initial art pass
- Playtest
- Fixes & additional art passes
- Second Playtest
- Final Touches
Like before, I did some art passes before playtesting, as Halo Infinite already has pre-created assets that I could use. I found that decorating some areas a little bit helped me in designing more prop/structure/cover placement, as it helped me better visualize what kind of objects would realistically match the surrounding space, while also planning for gameplay uses.
Pre-Planning
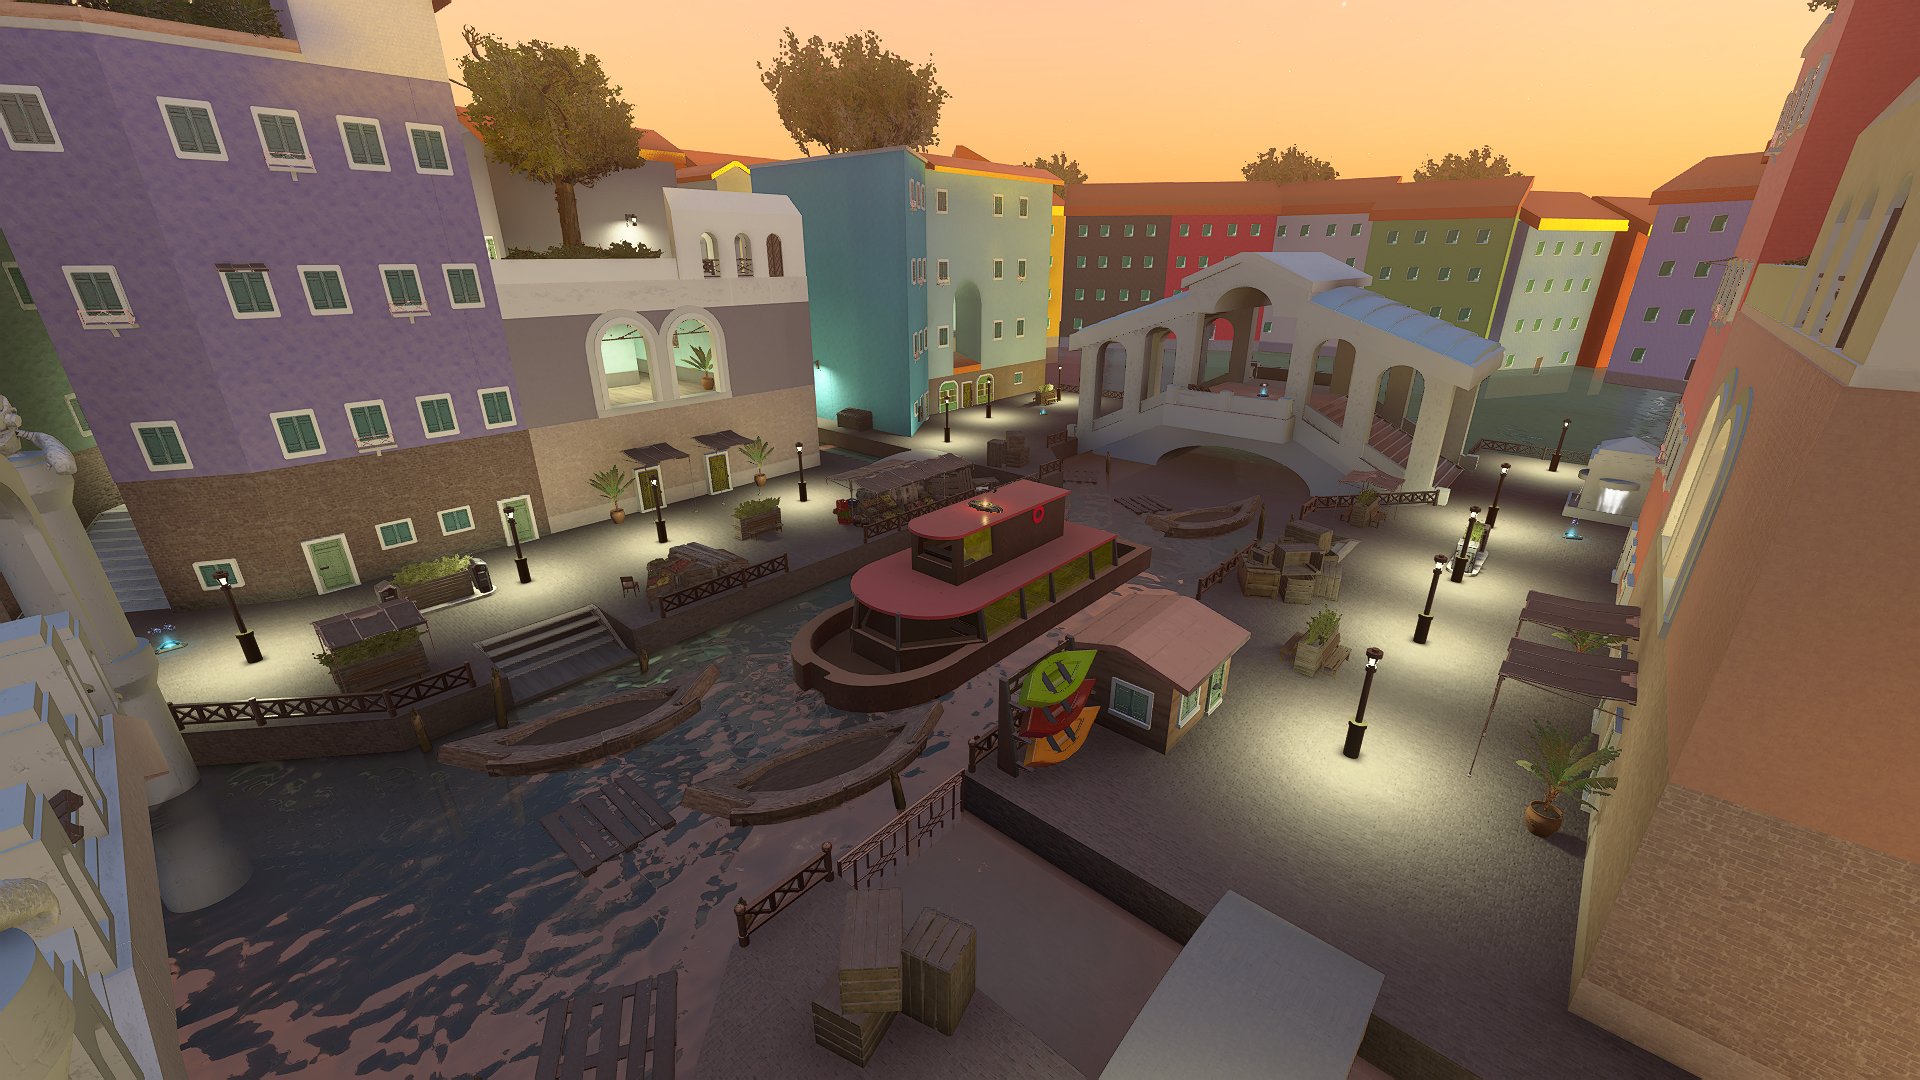
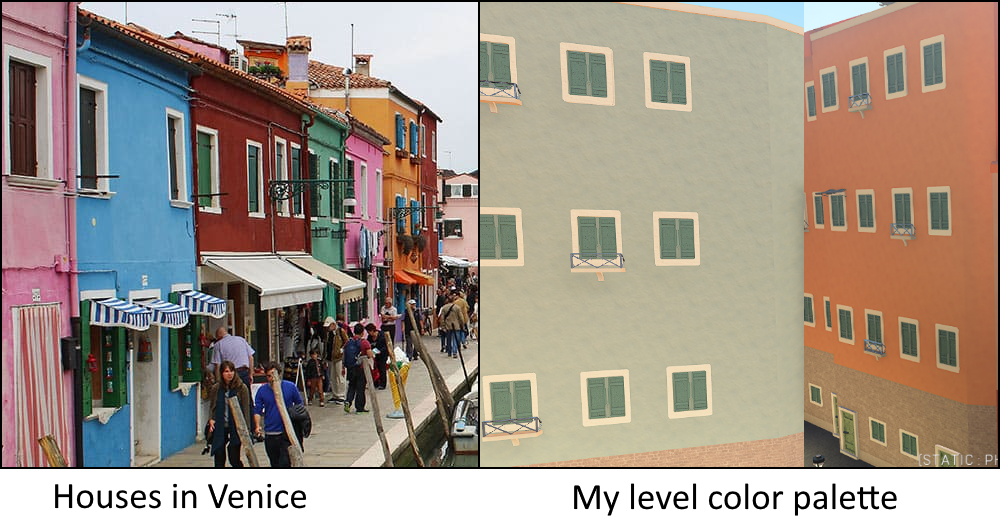
My first goal was to think of a theme. I had actually already entered this project with a theme in mind, Alto Mare from Pokemon; Heroes. Alto Mare is a city in Pokemon, that was highly inspired by the water ways of Venice. While this would typically mean that I should use Venice as the primary reference, Alto Mare in Pokemon featured much more greenery within the city, as they were more 'in-tune' with nature because of Pokemon. Thus my primary reference was Alto Mare from Pokemon, and my secondary reference was Venice.
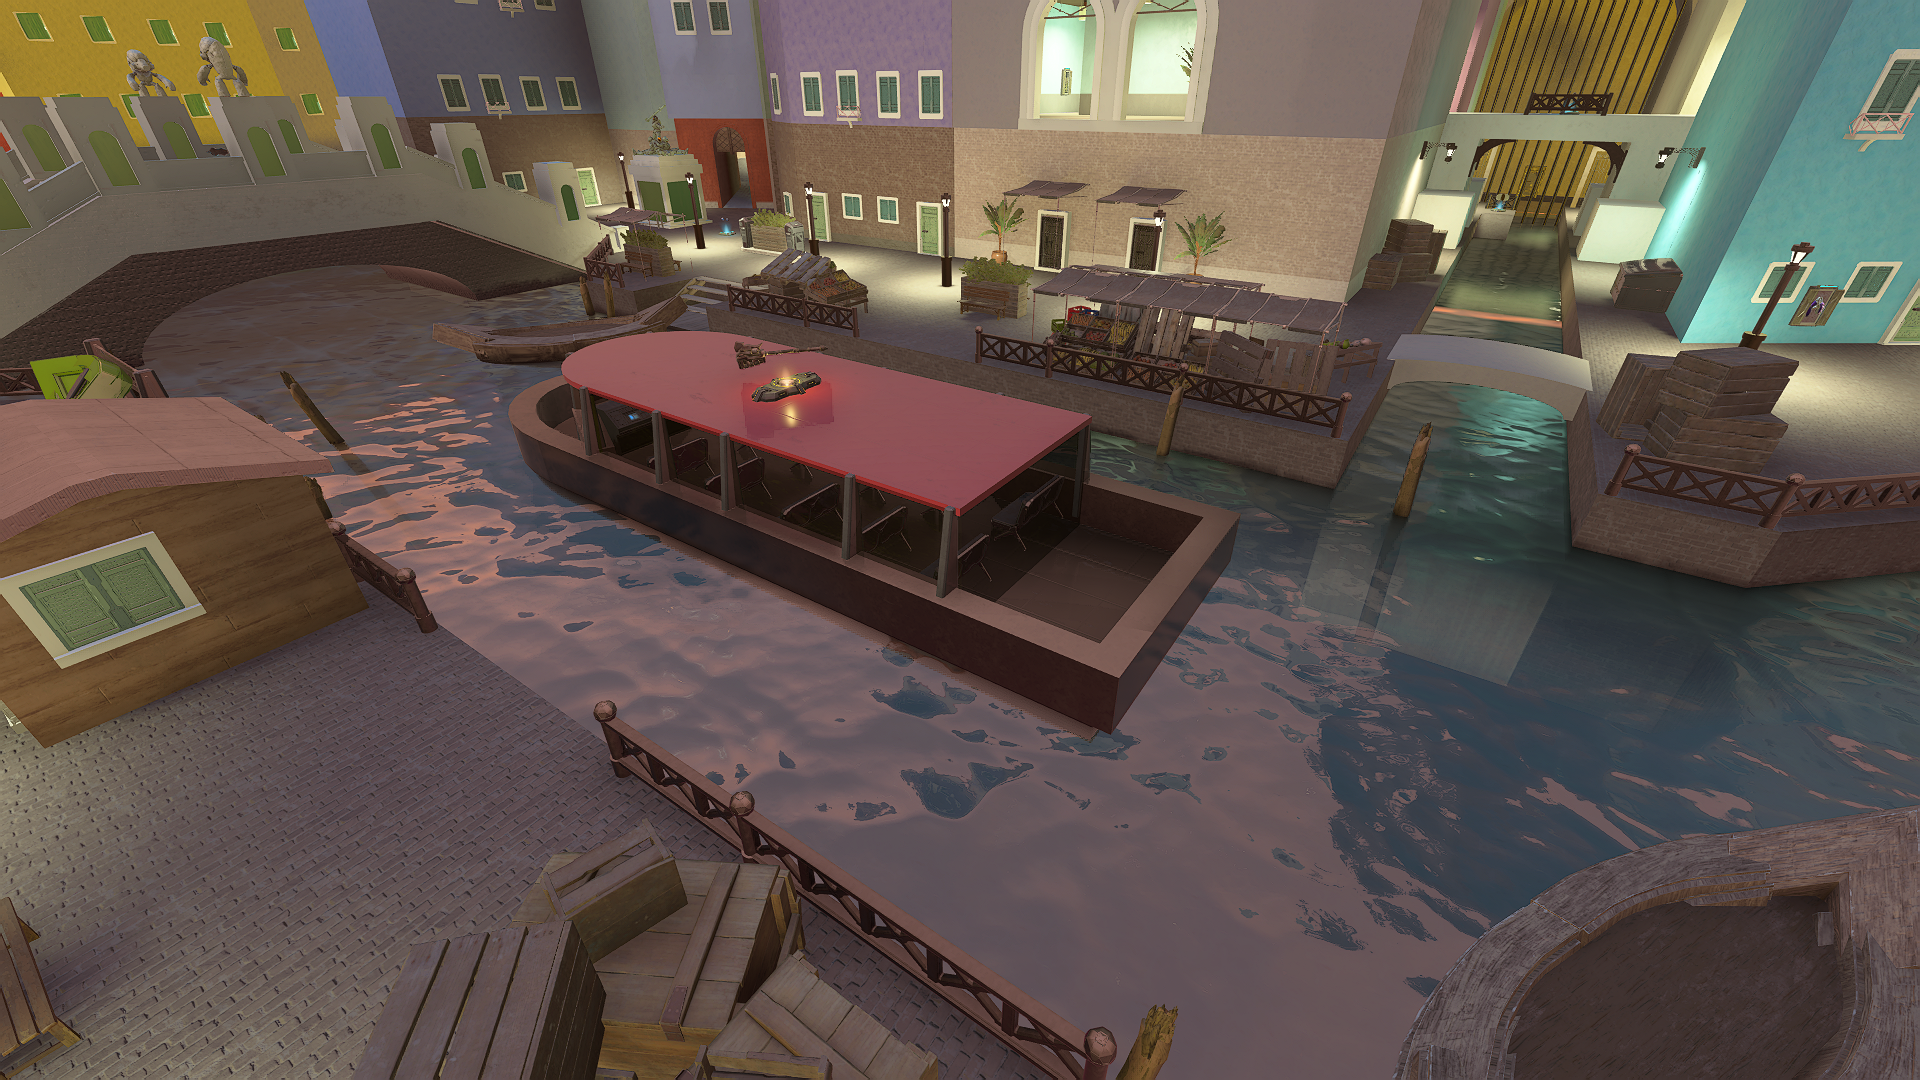
With the environment in mind, it was clear what would in the center of the map; a large canal full of water and boats. That left the two opposite sides of the map. While I wanted to try an asymetric design, I felt that I should first get better at gameplay flow just in general, so I stuck to a semi-symmetrical design, where one side of the canal was red team, and the other was blue team. I decided that the gameplay areas for these sides should take place in residential areas, in the alleys and courtyards between the buildings, as I felt that would create the most compelling gameplay.
After some more brainstorming, and ideation, I began to create some diagrams to map the connections of each space to eachother.
Diagrams
Previously, I started with a bubble diagram, but for this project I went straight into a layout design. I found that bubble diagrams didn't help my process too much, as I was already creating the links mentally.
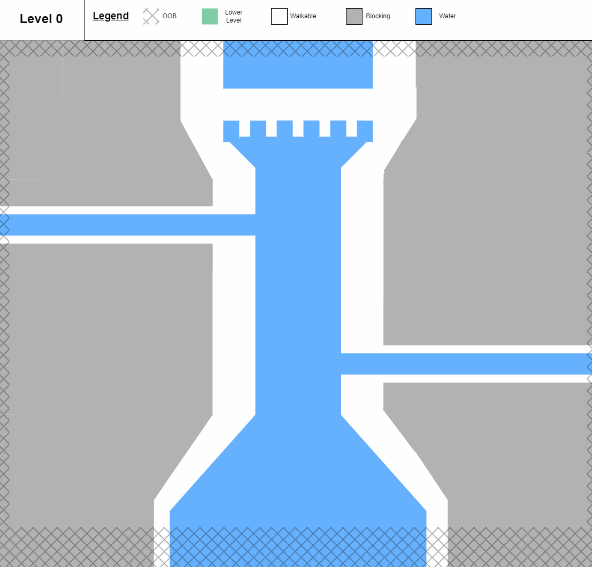
After creating this diagram, I predicted how the different teams would engage with the different areas. The following diagram predict's red team's behaviour.
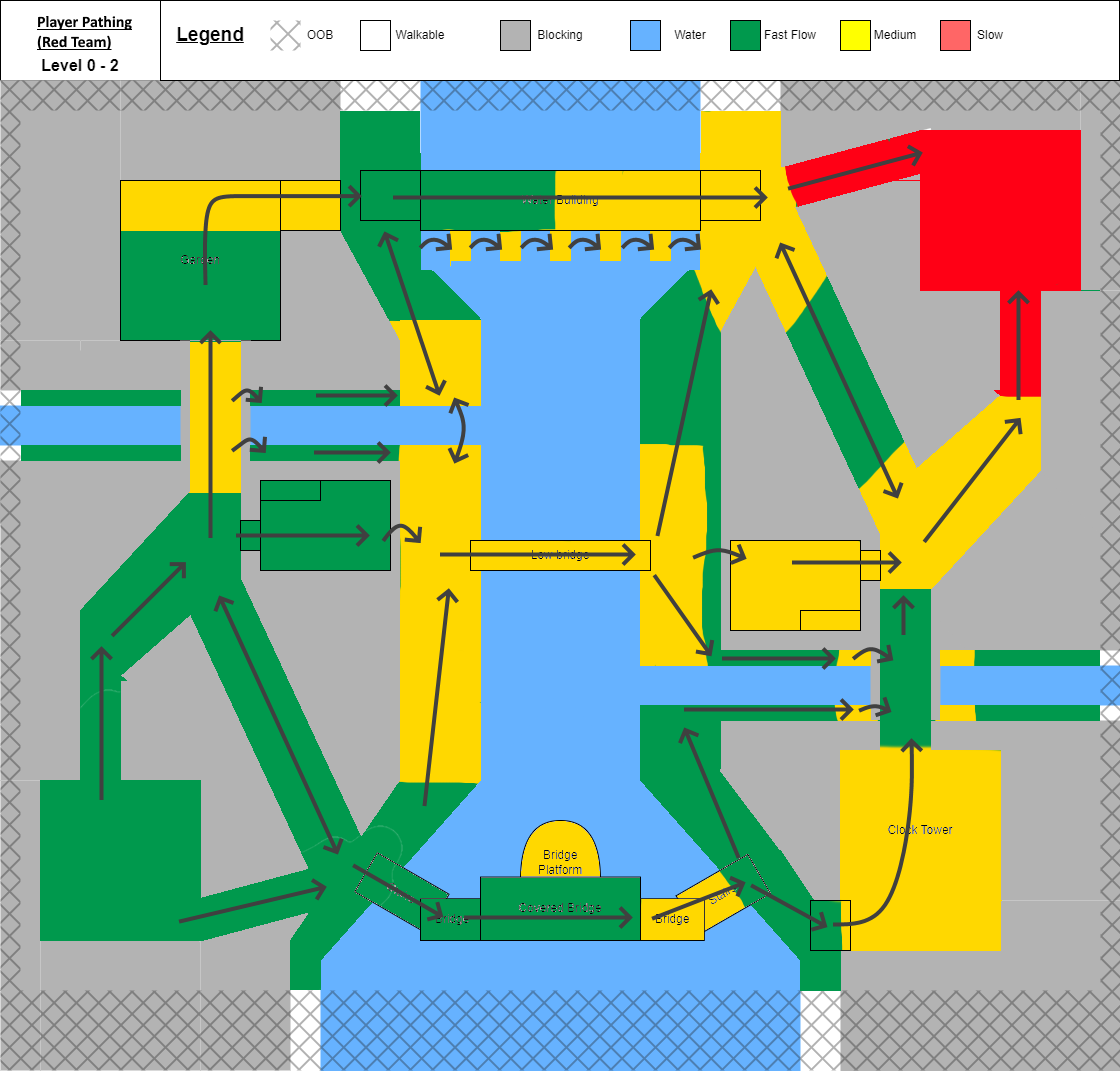
After predicting the flow for both teams, I went ahead with some weapon placement planning. I wasn't too sure on what weapons to put in the map intially, and mostly focused on positioning and quantity of weapons, power weapons, equipment and grenades.
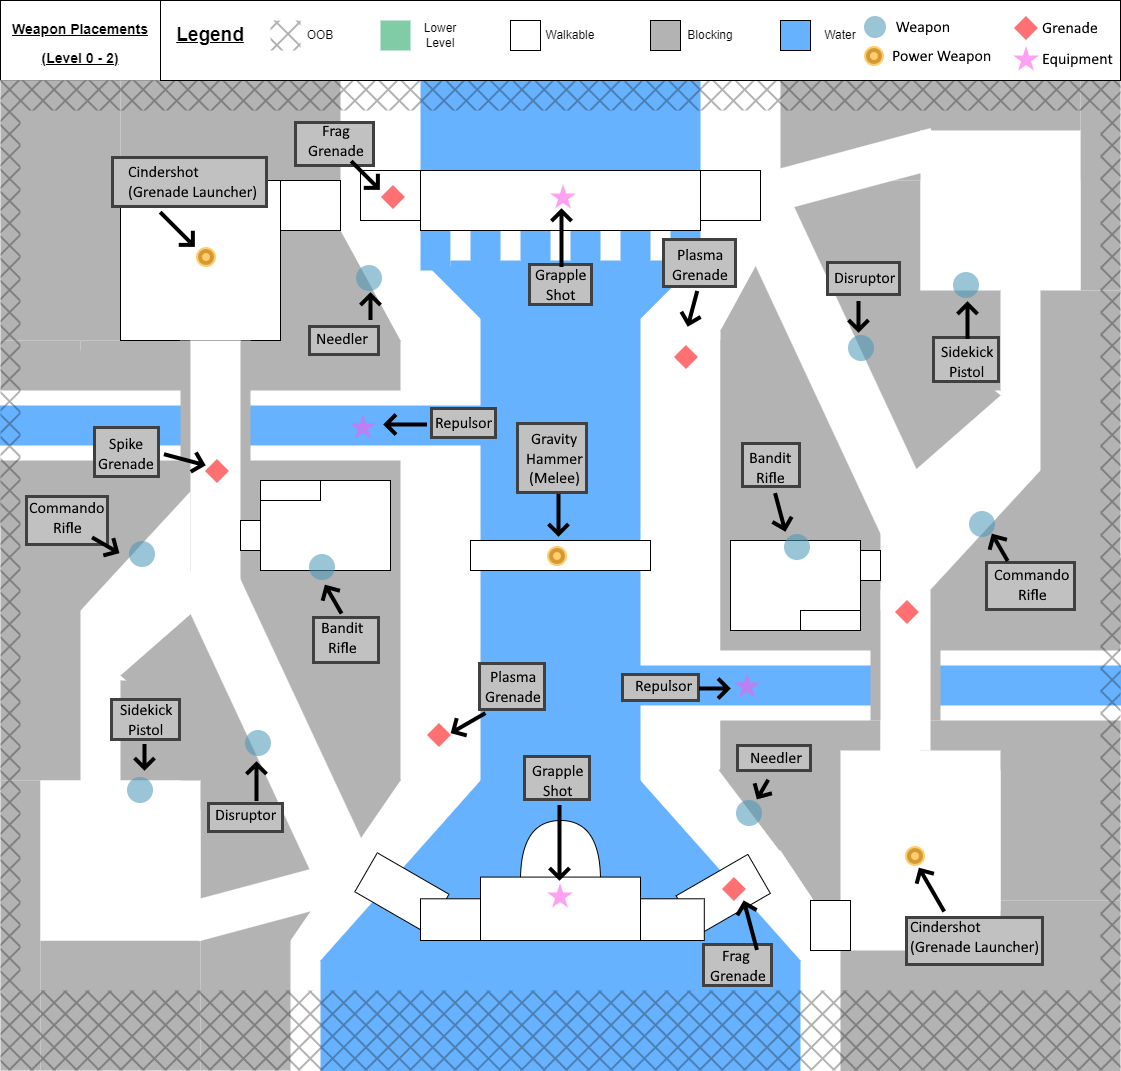
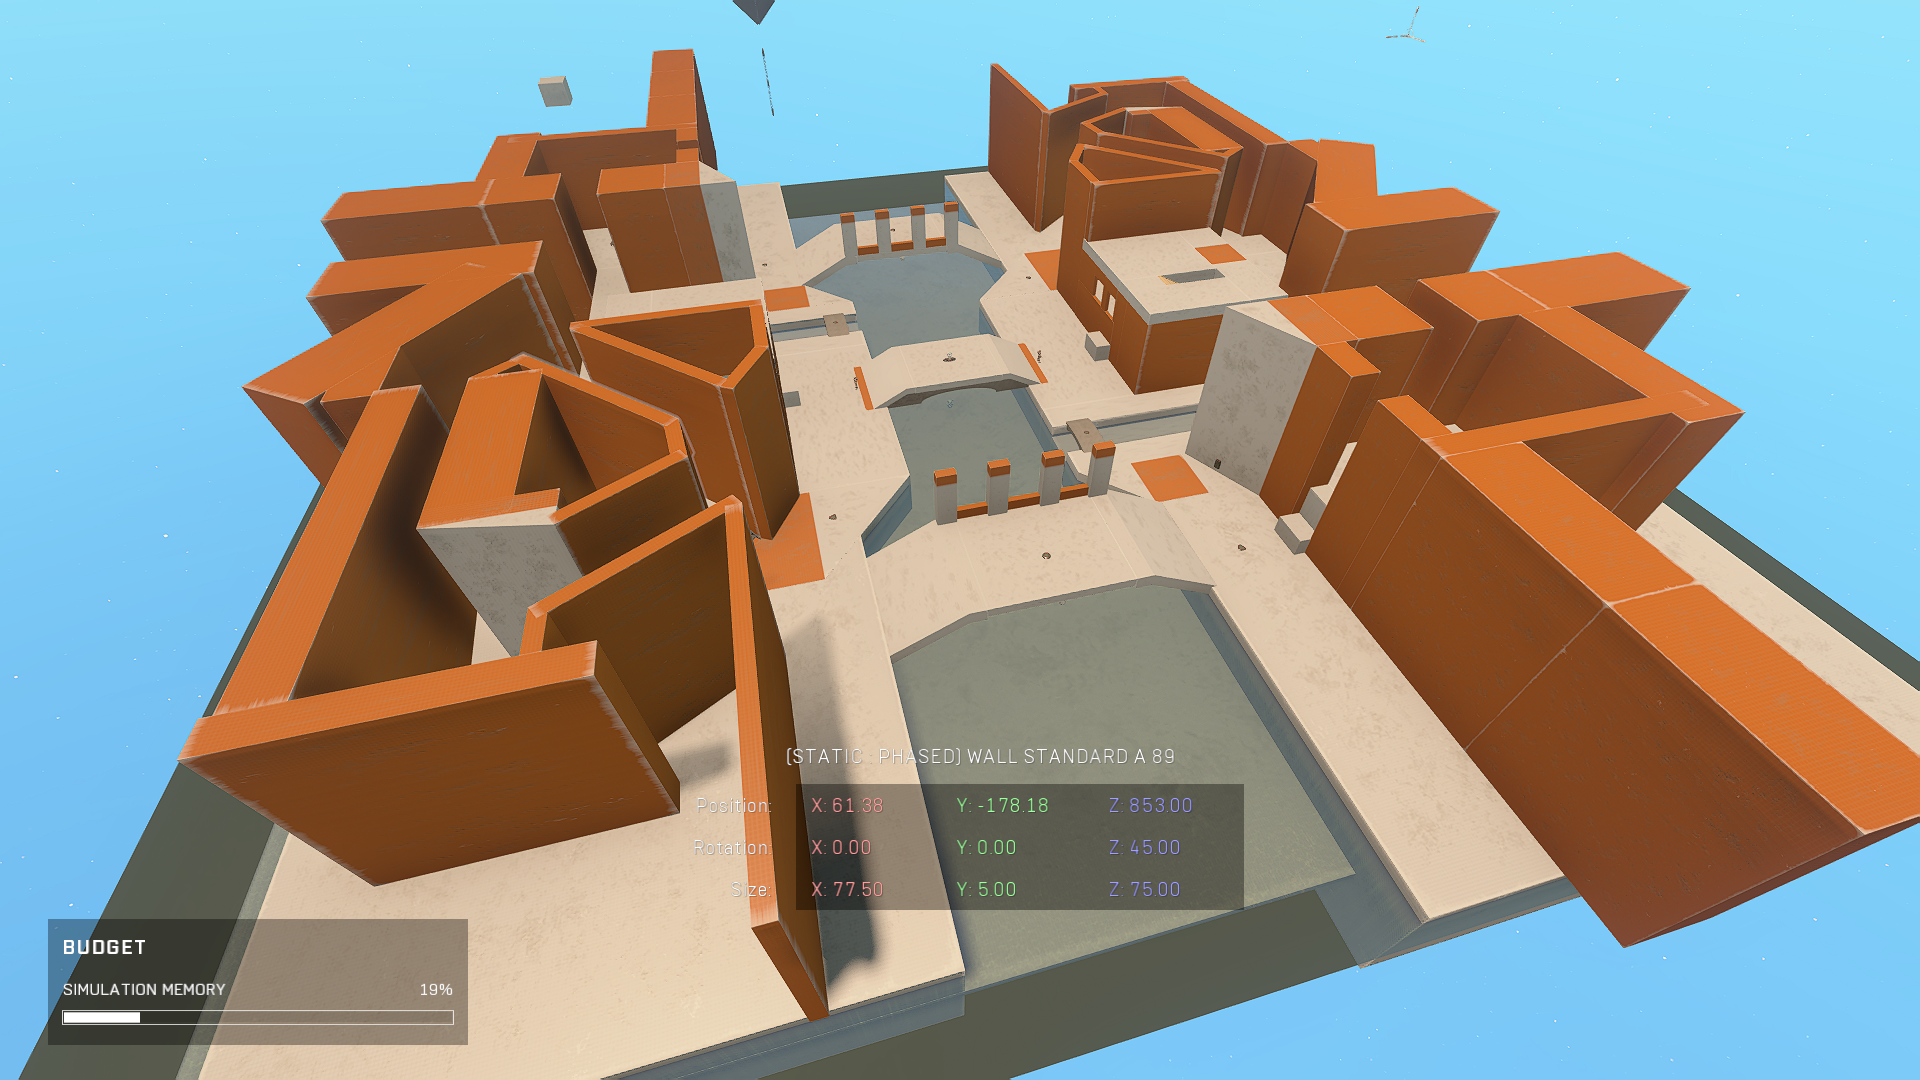
In-Engine Metric Greybox
I continued with the in-engine greybox, and after creating a rough design I immediately realized that the level was too large. I refered to some existing 4v4 map measurements, before continue, and adjusted my design accordingly. That said, the overall layout didnt change, but the metrics of the geometry had to.
With a second iteration completed, noticed that the canal being larger on one side of the map somewhat broke the balance of the level, since one side of the map required much more time on the bridge and, as a result, in the open. I decided to keep the canal the same size on both ends of the map.
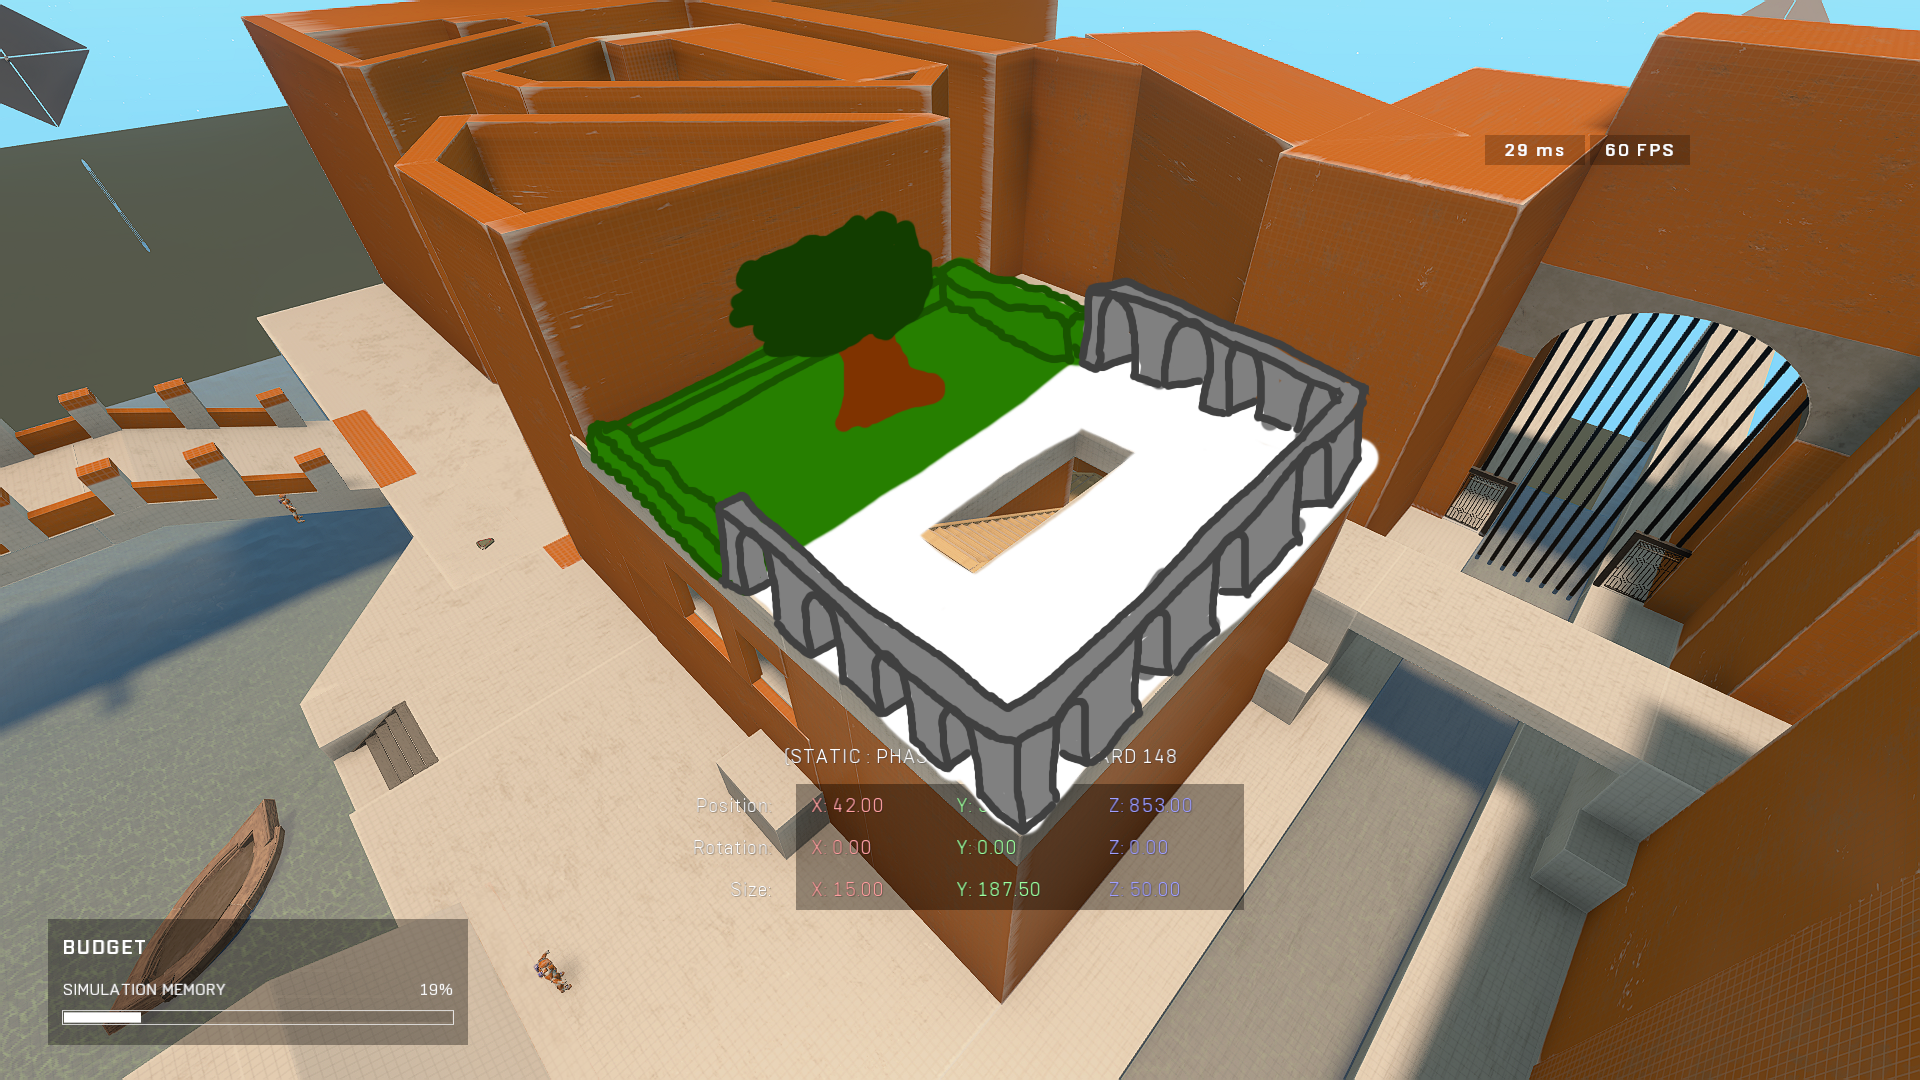
Before going further with more defined structures, I decided to screenshot the different areas in the map, and draw over them, to quickly plan out what they should look like. I found that this really helped me plan out what the areas should contain, helping me when creating the areas. After creating the sketches, I continued with creating them in-engine.
Gameplay Flow
With a rough greybox created, I placed the weapons, equipment and grenades. I then started on the more detailed structures.
During this step, I was placing cover, planning for traversal, jumps, & clambering, and also designing around the sightlines of each area. I tried to balance the different sightlines by matching their value to their danger level. IE. the sightlines on the roof have the most visability to most areas, but as a result the roof is visible, and vulnrable to many parts of the map as well.
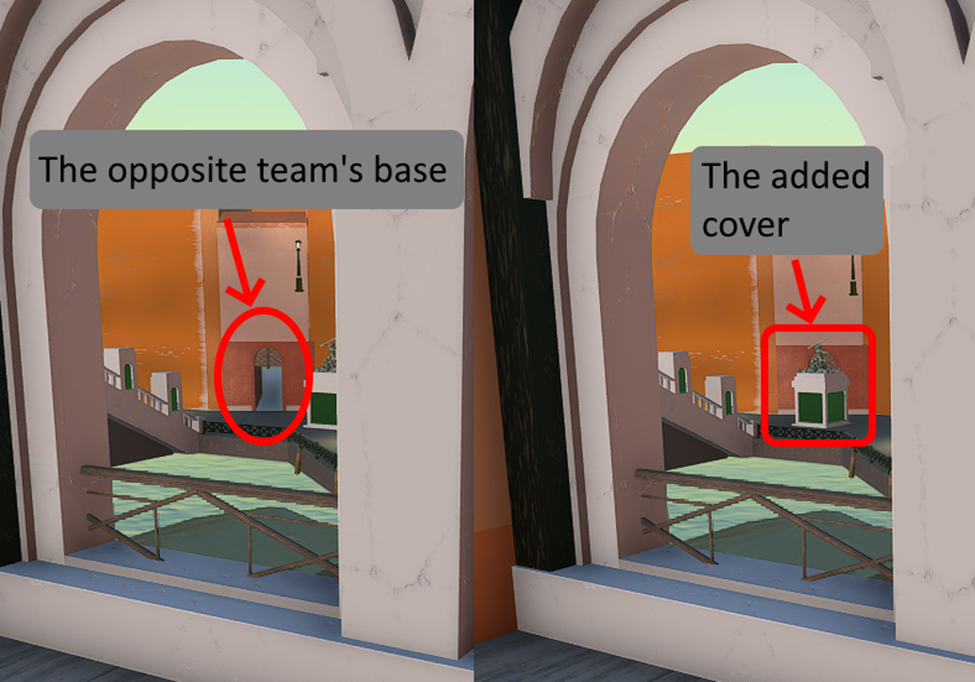
One issue I quickly came across with my design was that the rooftop sightlines could see directly into the enemy team's base. To fix this, I just placed a large structure infront of the base entrance that blocked the sightline.
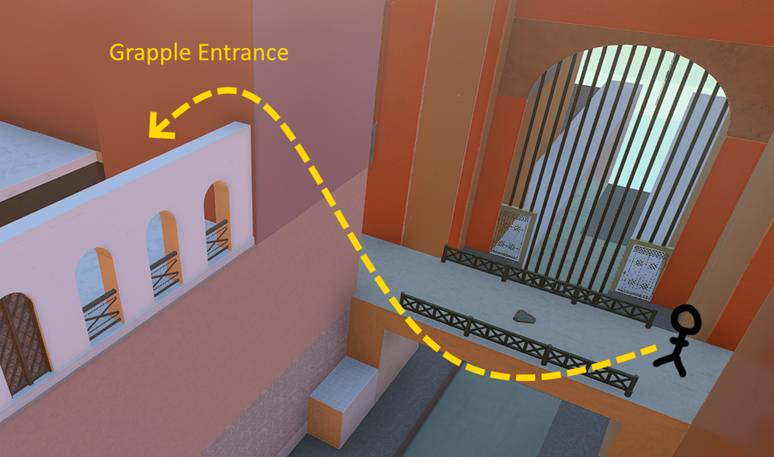
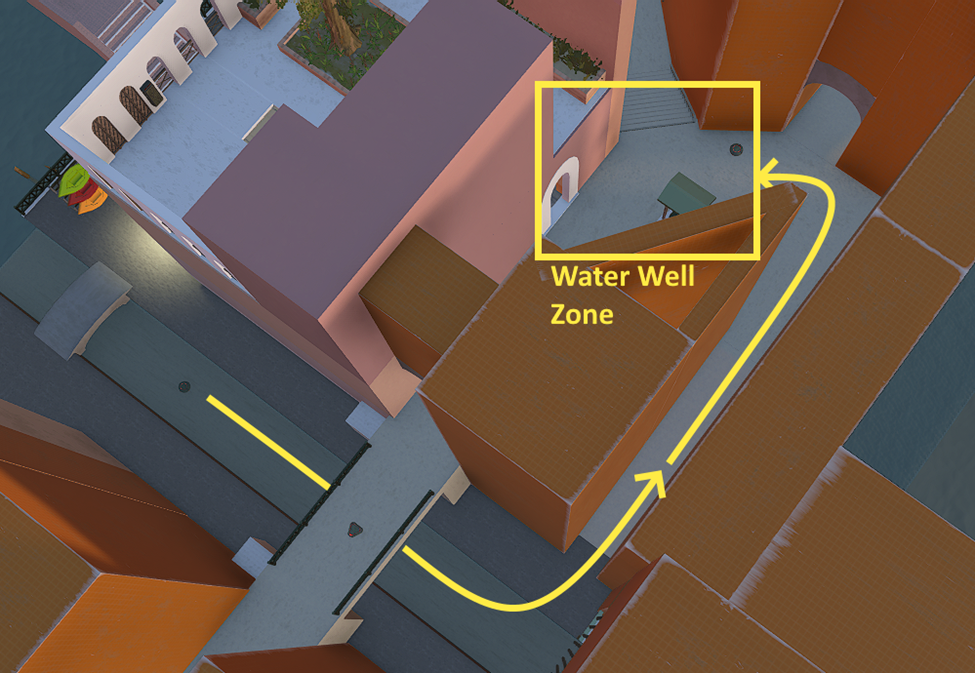
While planning for navigation, I had to make sure that the pathways were intuitive, and easy to understand, meaning that players should know where they are, and how to get to where they want to be. Since I had the grapple on the map, I also had to make sure that the grapple wasn't too overpowered, but that it still opened up pathways that wouldn't be available otherwise. During this step, I found that the area behind the small canal's bridge didn't really serve a purpose. Rather then immediately remove it, I thought about how it could be used, and decided to use it as an additional, more secretive, pathway to reach the water well area.
First Art Pass
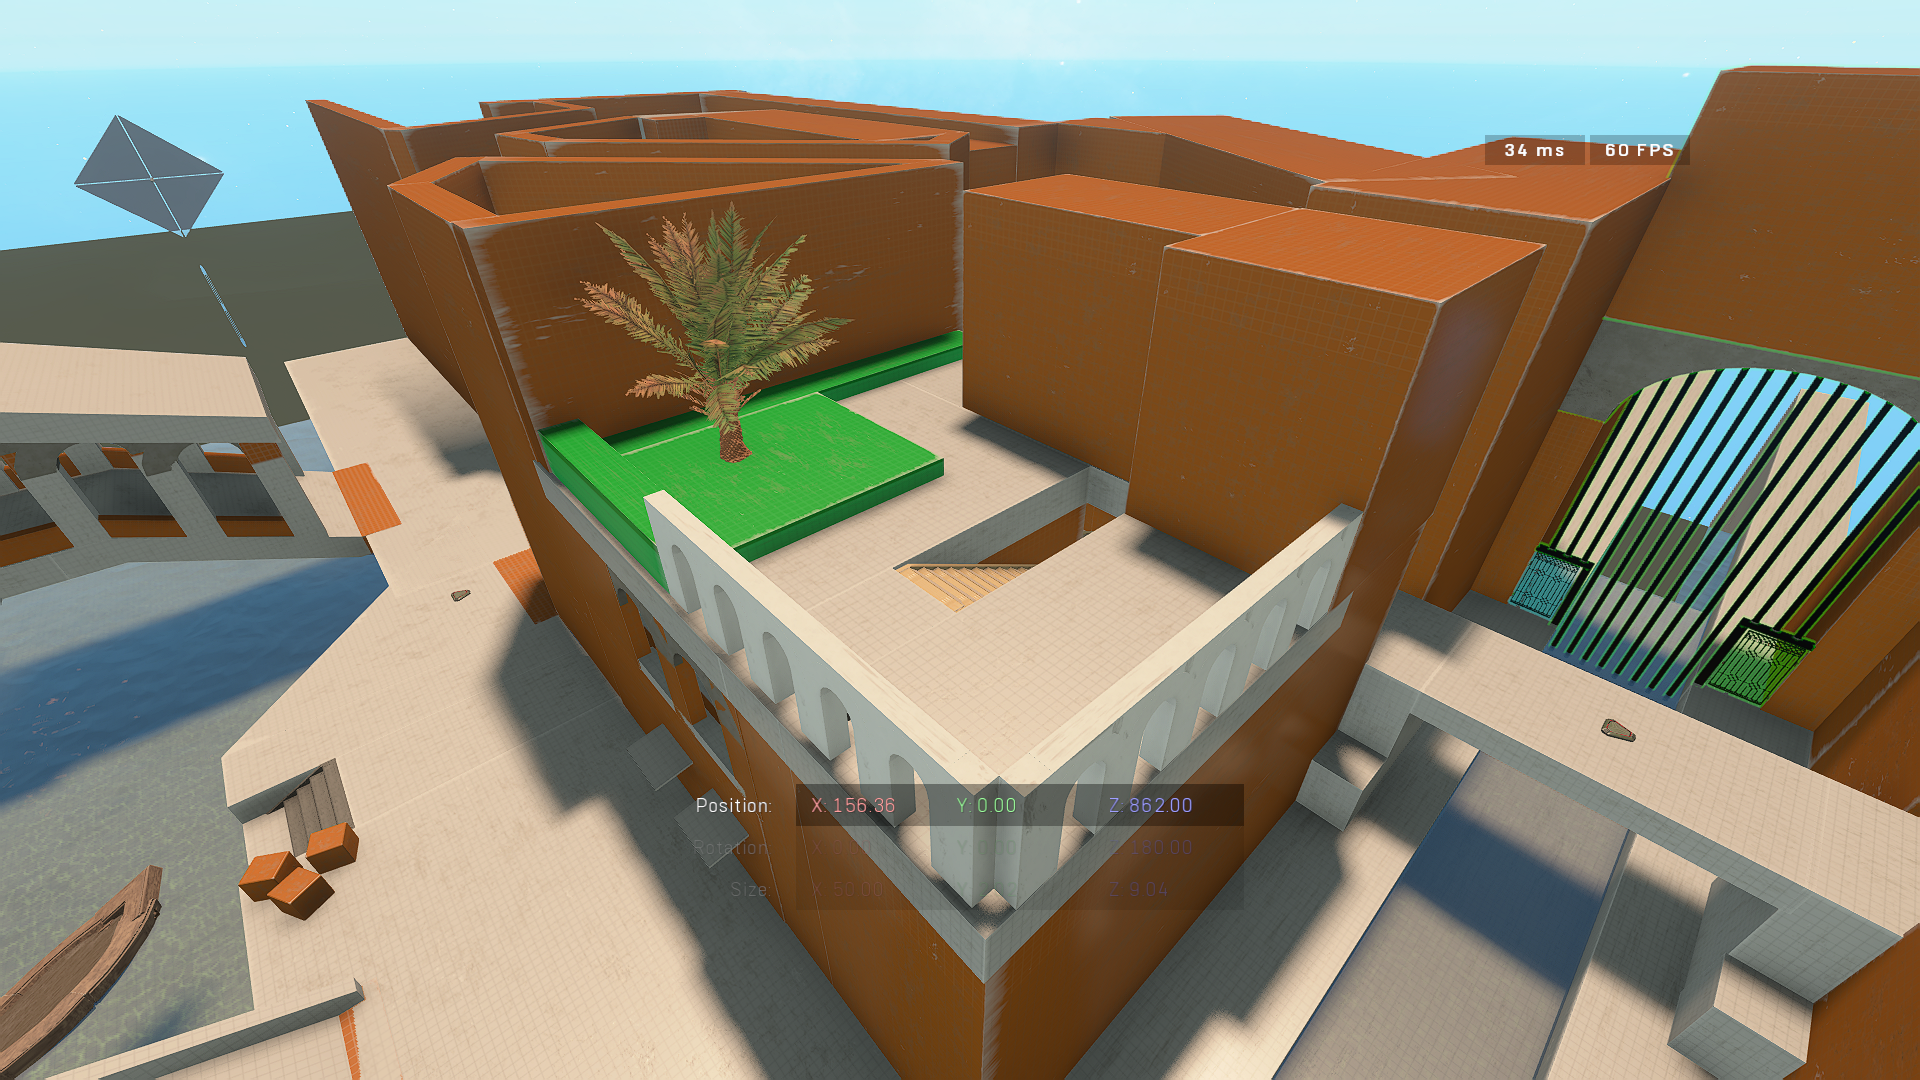
For the most part, I was decorating while designing areas, since Halo Infinite already has built in props. As mentioned earlier, this also helped me better plan out an area. When I came to the art pass, it was mostly working with lighting, and decorating & replacing some of the geometry pieces that weren't decorated.
During this step, I also retextured much of the larger geometry, as it was still a grid texture. Since these were going to be buildings in venice, I decided to go with a pastel color look for the paint, while also having stone-type textures as the base of buildings. To add some easy identification to each side, the red side would have mostly red pastels, while the blue side would have blue pastels. Its an easy and cheap solution, but it works for the purpose of this map since Venice has houses of all colors.

First Playtest
I was finally able to playtest this map with other players, and obtain their feedback.
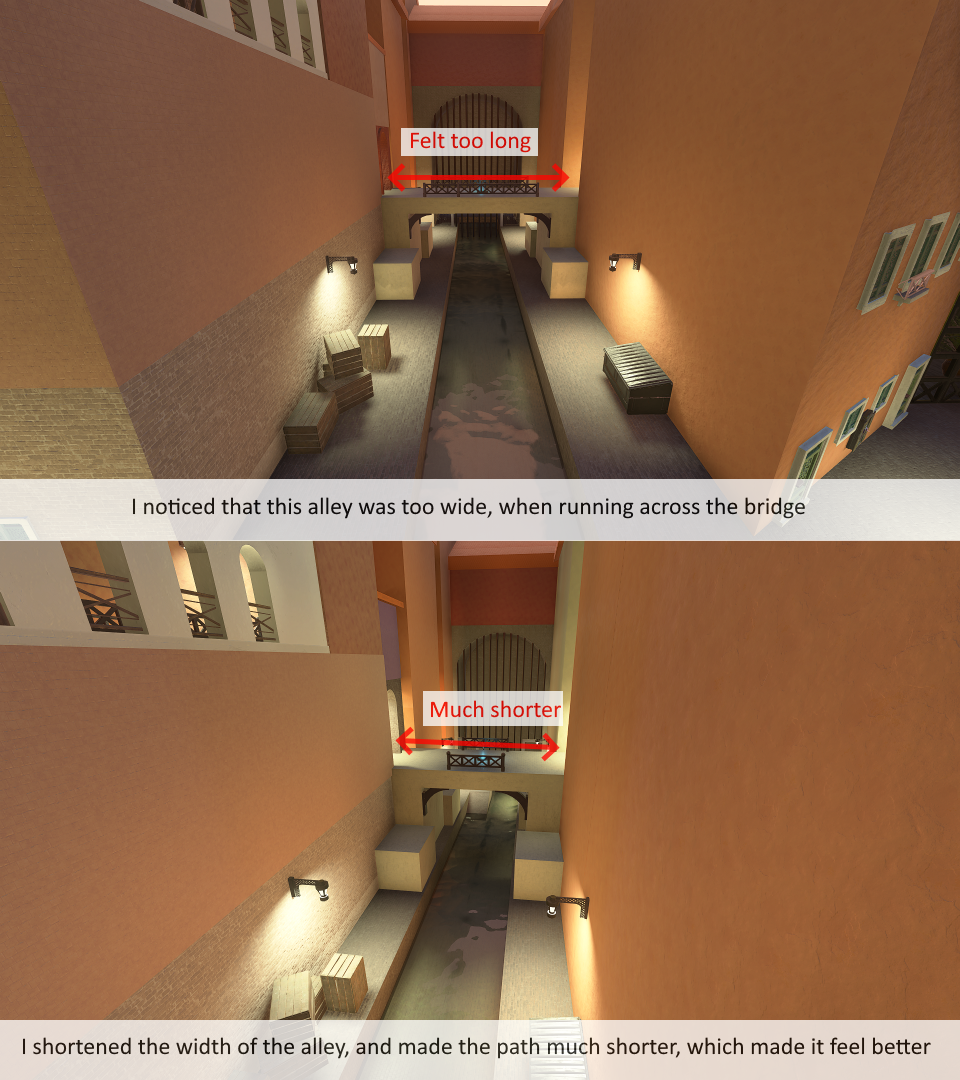
It was quickly noted that the map was too large for 4v4. While I should've noticed this sooner, I think I became used to the size while testing with bots. Regardless, I agreed with that feedback and decided to resize the map by reducing the length of passages I had already felt were too long.
Another point of feedback was that there were too many bridges, and not much variety in navigation in the central area. I decided to fix this by removing the central bridge, and replacing it with a boat the player had to platform onto, adding more danger to this route. Since one of the feedback points was that I should capitalize on the venice theme some more, this fix also addressed that.
While there were other feedback points, they were relatively simple changes, such as obstacle height changes, and object placements, and were all addressed accordingly.
Second Playtest Changes
After the second playtest, I was satisfied with the layout, and prop placements for the most part. The major feedback gained here was mostly about weapon placements, with some feedback about wanting additional paths to the center, from the bridges.
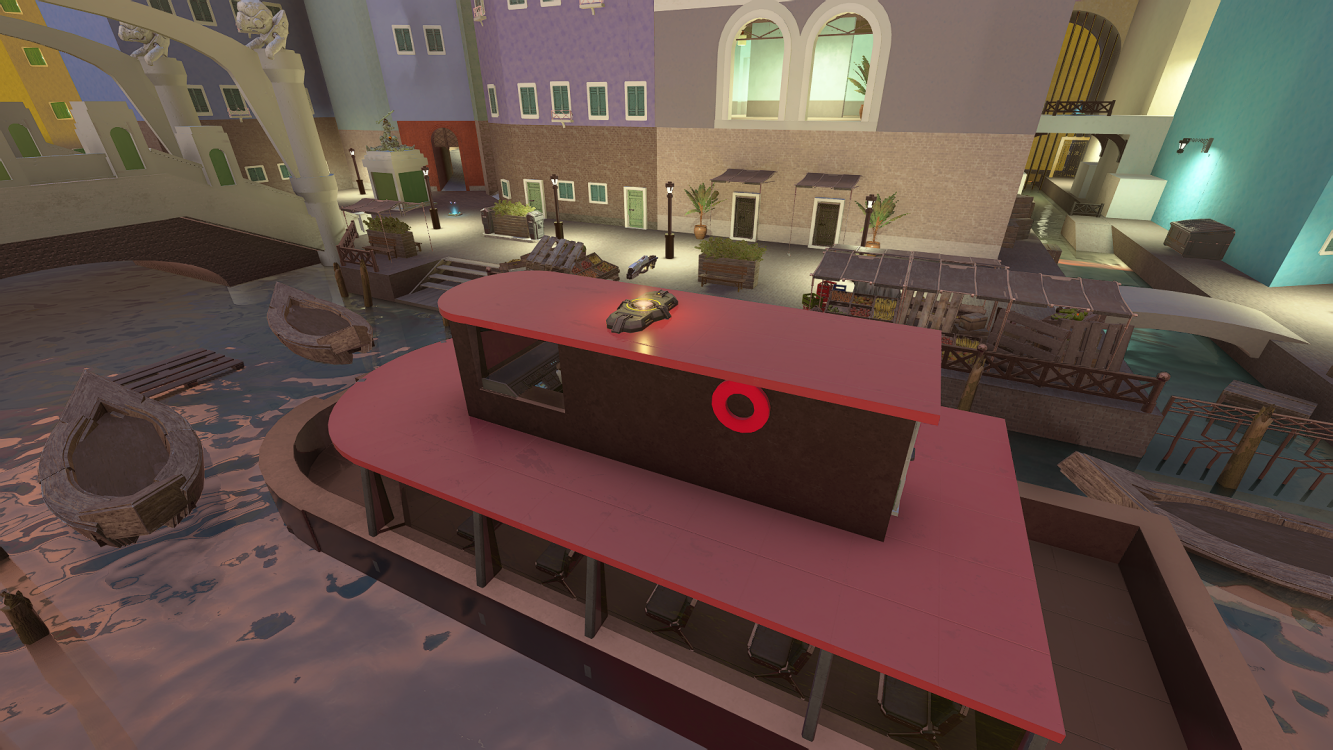
One design change was that I should include some more cover in the center to help the players against the snipers on the roof & building. I decided to add another level to the boat. This helped break the sightline, while also creating new ways to navigate in the center area, which was a large issue.
With regards to the weapons, no one ever went for the gravity hammer in the center. Players felt that this weapon didn't suit the map, and it should be replaced with a non-melee weapon, as it spawned in a heavy sightline area. I decided to replace it with a Backdraft Cindershot, which I felt solved this issue after testing it myself.
Another issue was that the existing cindershots (not the backdraft) felt like they were dominating the game, and they should be replaced with different weapons. I found that the issue was that the cindershot was really great at getting enemies in close quarters, and around bends, which was most of this level, and as a result, it was too powerful to have them spawn on both sides of the map. That said I wasn't sure on what to replace them with. Thus, I tested with a multitude of combinations, and eventually resulted in Skewers. They were long range, with made them useful for firing in the main canal, but only had one shot per relaod, making them less oppressive than a sniper.
Takeaways
Takeaways
Overall, I really enjoyed making this map, and found that my overall design skills have improved since my Water Damage level.
While I am happy with the final result, I feel that the process could've been much smoother had I playtested much earlier, as I had originally wanted. That said, I am looking forward to my next level design project, and bringing the experience I gained from this project onto the next one!
Level Design Document
Download Level Design Doc